-
Products
-
Industries
-
Company
-
Resources
As of March 2024 we have renamed Apexchat to Blazeo. We are excited to share the next part of our journey with our customers and partners.
The name ApexChat implies that we are primarily a chat company, which is no longer true. Now we have many offerings, such as call center services, AI, Appointment setting, SMS Enablement, Market Automation, and Sales acceleration (Q2 2024), that go beyond chat. The new name will not only allow us to convey the breadth of our offering but will also better convey our company’s mission and values.
Blazeo, which is derived from the word Blaze, evokes a sense of passion, speed, and energy. A “Blaze” is captivating, illuminates, and represents explosive growth. Blazeo encapsulates our mission to ignite such growth for our customers and partners by delivering innovation with passion, speed, and energy.
Below are the instructions to set up Facebook integration by creating an app.
Before we begin, please make sure you have a business account registered and verified with Facebook.
Without a verified business account Facebook does not grant you access to pull user data (name).
1) Go to developers.facebook.com, and log in if you aren’t already logged in.
2) Click on “My Apps” from the top right corner. Then, click the “Create App” button.
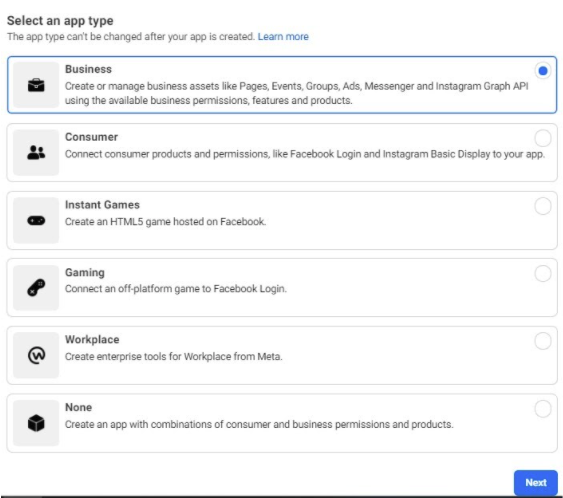
3) Select “Business” and click “Next”.

4) Give the app a name, enter your email address, select a business manager account, and click Create App.

5) You’ll be redirected to a page that asks you to add products to your app. You have to select the “Messenger” option, indicated below.

6) You’ll be taken to a new page where you will configure the settings.
7) Scroll down to the Webhooks section and click Add Callback URL.

8) Enter the Callback URL and Verify Token that was provided to you by your account rep. And click Verify and Save.

9) If you were able to Verify and Save successfully in the last step, you should see an Add or Remove Pages button. Please click that.
10) A new window will pop up asking you to log in to continue. Select the page you are trying to integrate and accept the permissions.

11) Now click the Add subscription button next to the page you just linked.

12) Please select the following subscriptions:
13) Now scroll up to the Access Token section. Click Generate Token and copy the value. You will need to provide this token to your ApexChat account rep.
Also, please provide your Facebook page URL (www.facebook.com/page name) to ApexChat account rep.

14) Next you’ll want to go to the app settings. You can go there by clicking the Settings > Basic option in the left side menu. Once you’re on the settings page, please add the appropriate values to the highlighted fields in the screenshot below:

15) Now you’ll want to go to the Permissions and Features page. You can go there by clicking the App Review > Permissions and Features from the left menu. On this page, you’ll want to search for messaging and click Request Advanced Access for pages_messages.
16) The button’s text will change, now click the Edit App Review Request button.
17) Scroll down to the Complete App Verification section and click the Provide verification details button.
18) Now you have to provide instruction on how the Facebook team can review the integration:
For this area, you have to select No for the first question, and then select My app doesn’t use the Facebook Login dialog.
Now click Save.
19) Scroll down and click the blue arrow in next section to edit page_messaging permission:
20) Now you have to provide details about why the pages_messages permission is required:
For the detailed description of how our app will use this permission, we wrote:
We'll be using the pages_messaging permission to enable live chat agents to conduct conversations on our Facebook page.
Access to this permission enables our live chat agents to monitor any new conversations that a user on our page starts.
The end-user will be able to receive a response to their messages sooner.
For testing the functionality, you’ll have to select the Facebook page you are trying to integrate. And provide these steps:
Step 1: Go to https://m.me/pageid
Step 2: Send a message to your page.
Step 3: Wait for a response from a live chat agent.
You’ll have to record yourself sending a message and getting a response, and upload that as the final step of the process.
21) You can now click Submit for Review at the bottom of the page.
Note: If your business manager isn’t already verified by Facebook you should do that first. For that verification, you’ll have to provide a business document that shows your organization’s name and physical address.